泛域名证书生成、安装、自动更新
泛域名证书生成、安装、自动更新
背景
- 腾讯云申请的域名,也就是本站的域名
up-4ever.site - 为了充分利用域名资源,在此主域名下有3个二级域名,类似
xx.up-4ever.site - 起初 https 证书都是申请的腾讯云的免费证书(50额度),但是由于其额度有限、无免费泛域名证书并且 60 天到期需要手动申请、部署等操作,甚是麻烦,不喜。
基于上述原因,调研并成功部署泛域名证书,遂记录博文于此,方便后续阅读亦方便有类似需求的朋友解决问题。
关于 acme.sh
acme.sh 实现了 acme 协议,可以从 ZeroSSL,Let's Encrypt 等 CA 生成免费的证书。
后续步骤均在云服务器进行
安装 acme.sh
安装很简单,一条命令:
1 | curl https://get.acme.sh | sh -s email=my@example.com |
或者
1 | wget -O - https://get.acme.sh | sh -s email=my@example.com |
普通用户和 root 用户都可以安装使用。
如果因为某种原因导致使用 curl https://get.acme.sh | sh -s email=my@example.com 网络超时,可以使用 gitee 方式安装 acme:
1 | git clone https://gitee.com/neilpang/acme.sh.git |
更多安装参数可参考:How to install
安装过程进行了以下几步:
- 把 acme.sh 安装到你的 home 目录下:
1 | ~/.acme.sh/ |
并创建 一个 shell 的 alias,例如 .bashrc,方便你的使用: alias acme.sh=~/.acme.sh/acme.sh
- 自动为你创建 cronjob, 每天自动检测所有的证书,如果快过期了,需要更新,则会自动更新证书。
贴一下我当时的命令:
生成证书
acme.sh 实现了 acme 协议支持的所有验证协议。
一般有两种方式验证: HTTP 和 DNS 验证。
我们重点看 DNS 自动验证的方式,因为 HTTP 验证不支持泛域名证书、DNS 手动验证需要手动更新证书,不符合我们的预期。
自动验证(DNS API)
DNS 方式的真正强大之处在于可以使用域名解析商提供的 API 自动添加 TXT 记录,且在完成验证后删除对应的记录。
acme.sh 目前支持超过一百家的 DNS API。
下面以腾讯云为例
- 进入 腾讯云 DNSPOD 控制台的 API 密钥管理
- 进入 DNSPod Token 选项卡,创建密钥
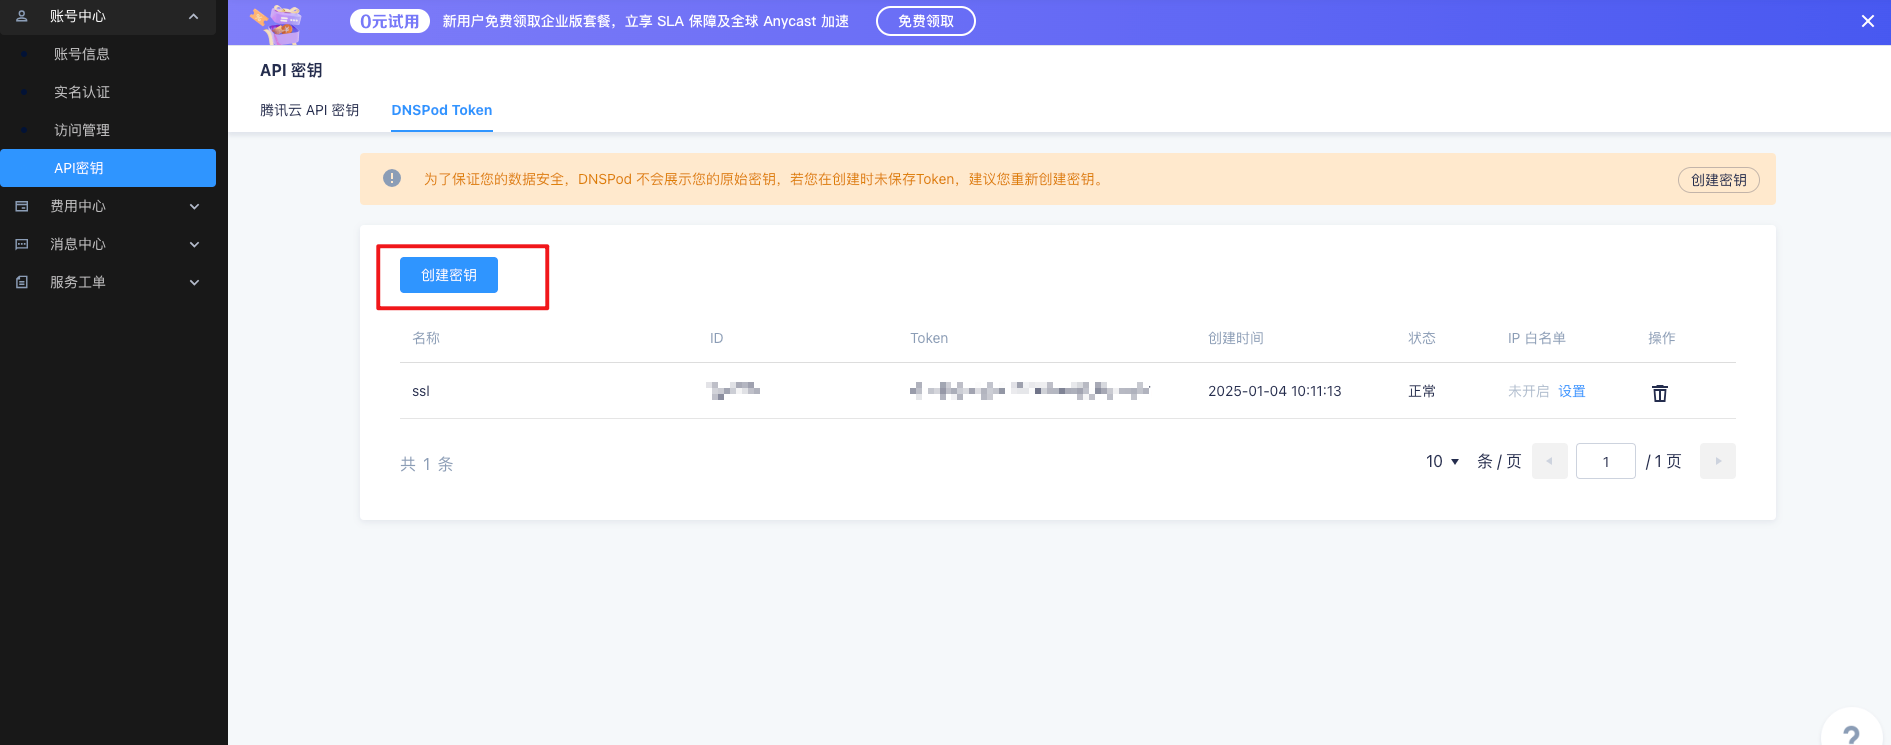
- 保存好 ID 及 Token
配置环境变量 & 生成证书
回到服务器中,将上面的 api 密钥配置为环境变量,供后面 acme 脚本生成 ssl 证书时使用
1 | # 配置环境变量 |
这些变量会被保存在
~/.acme.sh/account.conf
1 | 生成证书 |
Note: 此小节中所提及的 DP_Id、DP_Key、dns_dp是 DNSPod.cn 情况下要使用的。其他服务商参考更详细的 DNS API 用法: https://github.com/acmesh-official/acme.sh/wiki/dnsapi
安装(复制)证书
证书生成好以后,我们需要把证书复制给对应的 Apache、Nginx 或其他服务器去使用。
必须使用 --install-cert 命令来把证书复制到目标文件,请勿直接使用 ~/.acme.sh/ 目录下的证书文件,这里面的文件都是内部使用,而且目录结构将来可能会变化。
根据经验这个地方最好先想好证书的名字(随意),然后更新 nginx 配置(此时不重启)。准备好后再安装证书,安装完成后会自动重启 nginx 服务。
更改 Nginx 配置
1 | # path: /etc/nginx |
Nginx
1 | acme.sh --install-cert -d up-4ever.site --key-file /etc/nginx/up.key --fullchain-file /etc/nginx/up.cer --reloadcmd "nginx -s reload && node /root/script/index.js" |
其中 node /root/script/index.js 是我定制的主要是因为我用的是七牛云的图床,这个 js 脚本会自动上传生成的泛域名证书到七牛云供图片 CDN 域名 https 使用并发送邮件。下面会附上脚本内容。
默认情况下,证书每 60 天更新一次(可自定义)。更新证书后,Apache 或者 Nginx 服务会通过 reloadcmd 传递的命令自动重载配置。
注意:reloadcmd 非常重要。证书会自动申请续签,但是如果没有正确的 reloadcmd 命令,证书可能无法被重新应用到 Apache 或者 Nginx,因为配置没有被重载。
查看已安装证书信息
1 | acme.sh --info -d up-4ever.site |
会输出如下内容:
1 | DOMAIN_CONF=/root/.acme.sh/example.com/example.com.conf |
更新证书
目前证书每 60 天自动更新,你无需任何操作。
但是你也可以强制续签证书:
1 | acme.sh --renew -d up-4ever.site --force |
关于修改 reloadcmd
目前修改 reloadcmd 没有专门的命令,可以通过重新安装证书来实现修改 reloadcmd 的目的。
此外,安装证书后,相关信息是保存在 ~/.acme.sh/example.com/example.conf 文件下的,内容就是 acme.sh --info -d example.com 输出的信息,不过 reloadcmd 在文件中使用了 Base64 编码。理论上可以通过直接修改该文件来修改 ReloadCmd,且修改时,无需 Base64 编码,直接写命令原文 acme.sh 也可以识别。
不过,由于 example.conf 文件的位置和内容格式以后可能会改变,且 example.conf 一直都是内部使用,后续也有可能会改为用 SQLite 或者 MySQL 格式存储. 所以一般不建议自己修改。
更新 acme.sh
acmd.sh 还在不断开发中,因此强烈建议保持并使用最新的版本。
升级 acme.sh 到最新版:
1 | acme.sh --upgrade |
如果你不想手动升级,可以开启自动升级:
1 | acme.sh --upgrade --auto-upgrade |
之后,acme.sh 就会自动保持更新了。
你也可以随时关闭自动更新:
1 | acme.sh --upgrade --auto-upgrade 0 |
上传证书到七牛云脚本
七牛云证书相关接口文档:https://developer.qiniu.com/fusion/8593/interface-related-certificate
1 | const qiniu = require('qiniu'); |
最后
2 个月后验证效果0.0