AST实现函数自动包裹try/catch
背景
看到一篇关于AST的文章,关于如何通过AST自动给函数包裹try/cache,实现错误的自动捕获上报。感觉真的好玩,以前对AST了解的也不多,于是参考该文章自己实现了一下,并且发npm包,在实际项目中使用并验证。写此文记一下。
文章主要参考哈罗出行-杭州团队:AST实现函数错误的自动上报、Alibaba F2E团队:用JS解释JS!详解AST及其应用,还查阅babel官方网站的一下API。
在此对这些优秀的FE团队表示感谢。
真是一个伟大的时代。
下面是正文。
实现效果
开发环境:
1
2
3
| var fn = function() {
console.log('hello, world');
}
|
线上环境
1
2
3
4
5
6
7
| var fn = function() {
+ try {
console.log('hello, world');
+ } catch(error) {
+ console.log(`${custom-error-info}`, error);
+ }
}
|
custom-error-info是在loader的options中自定义的错误提示信息。
AST是什么
百度百科对AST的解释是:在计算机科学中,抽象语法树(Abstract Syntax Tree,AST),或简称语法树(Syntax tree),是源代码语法结构的一种抽象表示。它以树状的形式表现编程语言的语法结构,树上的每个节点都表示源代码中的一种结构。
当我们查看目前主流的项目中的 devDependencies,会发现各种各样的模块工具。归纳一下有:JavaScript转译、css预处理器、elint、pretiier 等等。这些模块我们不会在生产环境用到,但它们在我们的开发过程中充当着重要的角色,而所有的上述工具,都建立在 AST 的基础上。
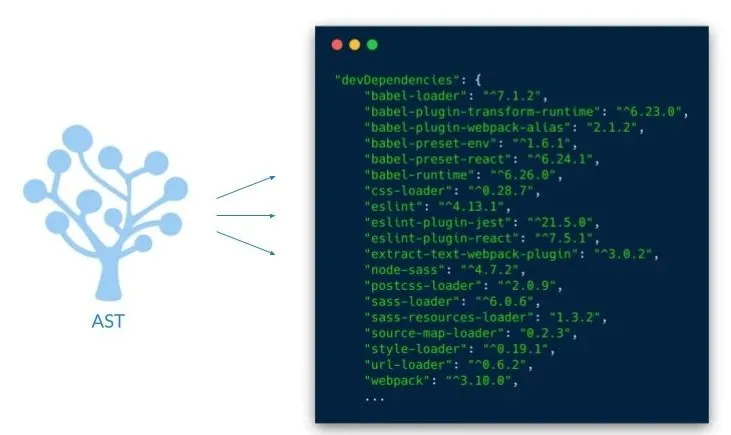
AST工作流程

- parse:把代码解析为AST
- transform:对AST中的各个节点做相关操作,如新增、删除、替换、追加。业务开发的95%的代码都在这里
- generator:把AST转换为代码
AST辅助开发工具:AST explore
1
2
3
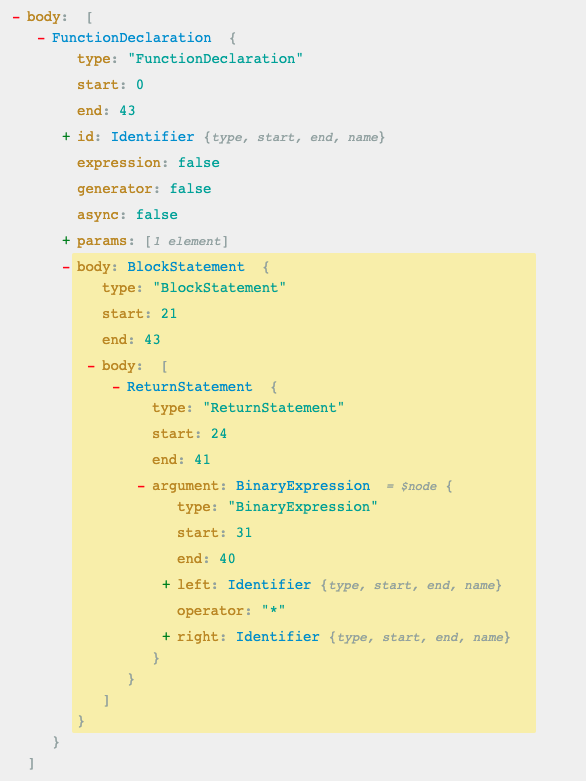
| function square(num) {
return num * num;
}
|
上面这段代码解析为AST:
babel是什么
Babel 是JS编译器,主要用于将 ECMAScript 2015+ 版本的代码转换为向后兼容的 JavaScript 语法,以便能够运行在当前和旧版本的浏览器或其他环境中。
此外它还拥有众多模块可用于不同形式的静态分析。
静态分析是在不需要执行代码的前提下对代码进行分析的处理过程 (执行代码的同时进行代码分析即是动态分析)。 静态分析的目的是多种多样的, 它可用于语法检查,编译,代码高亮,代码转换,优化,压缩等等场景。
简单说就是从一种源码到另一种源码的编辑器!下面列出的是 Babel 能为你做的事情:
- 语法转换
- 通过 Polyfill 方式在目标环境中添加缺失的特性 (通过 @babel/polyfill 模块)
- 源码转换 (codemods)
Babel 的三个主要处理步骤分别是: 解析(parse),转换(transform),生成(generate)。
这个处理过程中的每一步都涉及到创建或是操作抽象语法树。
本文将写一个Bable Plugin的npm包,用于编译时将代码进行改造,为函数自动包裹try/catch, 实现错误捕获。
开发工具介绍
前面说过Babel的运行主要分3个阶段:解析、转换、生成。每个阶段Babel官方都提供了核心的lib:
@babel/core
Babel的核心库,提供了将代码编译转化的能力。
@babel/paerse
通过 babel/parser 将源代码转为 AST,简单形象。
@babel/types
Babel Types模块是一个用于 AST 节点的 Lodash 式工具库(译注:Lodash 是一个 JavaScript 函数工具库,提供了基于函数式编程风格的众多工具函数), 它包含了构造、验证以及变换 AST 节点的方法。 该工具库包含考虑周到的工具方法,对编写处理AST逻辑非常有用。
@babel/template
babel-template 是另一个虽然很小但却非常有用的模块。它能让你编写字符串形式且带有占位符的代码来代替手动编码,尤其是生成的大规模 AST的时候。 在计算机科学中,这种能力被称为准引用(quasiquotes)。@bable/types 可以创建 ast 节点,但过于繁琐,通过 @babel/template 则可以快速创建整段的 ast 节点。
@babel/generator
Babel Generator模块是 Babel 的代码生成器,它读取AST并将其转换为代码和源码映射(sourcemaps)。
@babel/traverse
Babel Traverse(遍历)模块维护了整棵树的状态,并且负责替换、移除和添加节点。95% 以上的代码量都是通过 @babel/traverse 在写 visitor。
visitor 的第一个参数是 path,path 不直接等于 node(节点),path 的属性和重要方法组成如下:
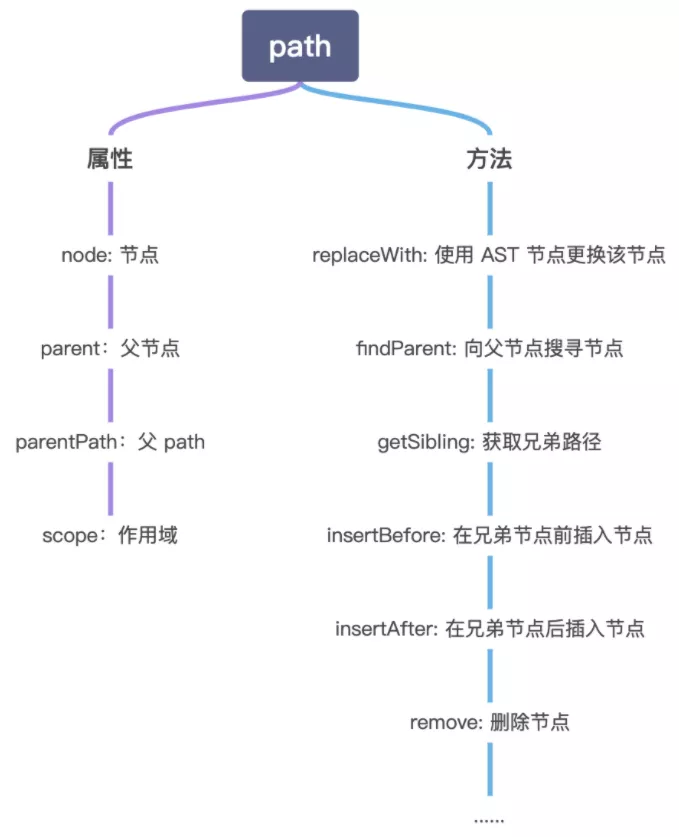
详细的API和option可以参考babel官网
环境搭建
我们最终打算要发一个npm包,所以执行命令如下:
1
2
3
4
5
6
| //初始化npm项目
npm init --yes
//创建.npmignore,过滤部分不打算发布的文件
touch .npmignore
//安装依赖
npm i @babel/core @babel/parser babel-traverse @babel/template babel-types -S
|
此时目录结构为:
1
2
3
4
5
| .
├── .npmignore
├── node_modules
├── package-lock.json
└── package.json
|
另外关于.npmignore
npm publish的时候会把项目目录里面所有的文件都publish到npm仓库中, 但是往往有一部分目录和文件不想发布上去,比如项目的源码、编译脚本等等信息。
可以使用.gitignore来设置忽略哪些文件,在git代码管理和npm publish都会忽略。
也可以使用.npmignore,写法和.gitignore写法一致。如果同时使用了.gitignore和.npmignore,只有.npmignore会生效,优先级较高。
或者在package.json中的file字段设置发布哪些文件或者目录。这个优先级高于.npmignore和.gitignore。
参考npm doc package.json#file
另外npm publish默认的忽略规则:
- .git
- CVS
- .svn
- .hg
- .lock-wscript
- .wafpickle-N
- .DS_Store
- npm-debug.log
- .npmrc
- node_modules
- config.gypi
- package-lock.json
- All files containing a * character
默认包含,忽略文件无效的:
- package.json
- README
- CHANGES / CHANGELOG / HISTORY
- LICENSE / LICENCE
- NOTICE
- The file in the “main” field
调试
新建一个index.js文件并编辑:
1
2
3
4
5
6
7
8
9
10
11
12
| const parse = require('@babel/parser');
let source = `let fn = function() {
console.log('hello, world');
}`
let ast = parse.parse(source, {
sourceType: 'module',
plugins: ["dynamicImport"]
});
console.log(ast);
|
终端执行node index.js后会打印出:
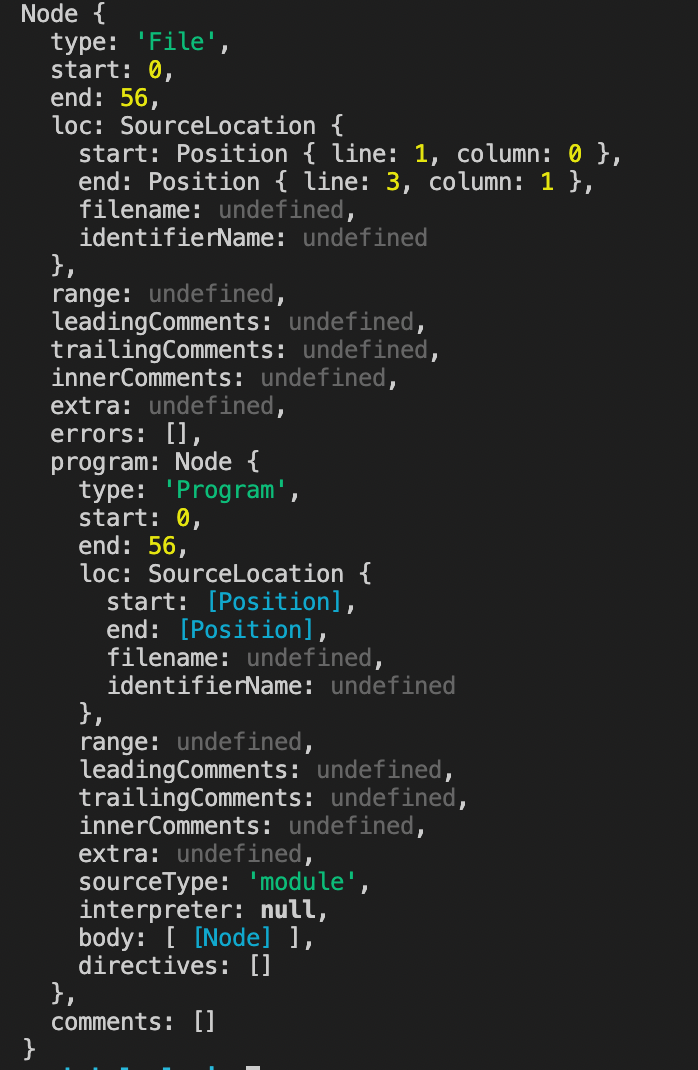
这是函数fn对应的ast,第一步解析完成。
然后我们要使用babel-traverse来遍历对应的AST节点,我们想要寻找所有的 function 表达可以写在 FunctionExpression 中:
1
2
3
4
5
6
7
8
9
10
11
12
13
14
15
16
17
18
| const parse = require('@babel/parser');
+ const traverse = require('babel-traverse').default;
let source = `let fn = function() {
console.log('hello, world');
}`
// 1. 解析
let ast = parse.parse(source, {
sourceType: 'module',
plugins: ["dynamicImport"]
});
// 2、遍历
+ traverse(ast, {
+ FunctionExpression(path) { // 函数表达式节点
+ // do some stuff
+ },
+ });
|
这是一个简单的访问者(visitor),把它用于遍历中时,每当在树中遇见一个 FunctionExpression 的时候会调用 FunctionExpression() 方法。
所有函数表达式都会走到 FunctionExpression 中,然后我们可以在里面对其进行修改。
其中参数 path 用于访问到当前的节点信息 path.node,也可以像 DOM 树访问到父节点的方法 path.parent。
接下来要做的是在 FunctionExpression 中去劫持函数的内部代码,然后将其放入 try 函数内,并且在 catch 内加入自定义错误信息的代码段。
上面定义的函数是:
1
2
3
| let fn = function() {
console.log('hello, world');
}
|
我们可以使用 path 拿到这段代码的 AST 信息,如下:
1
2
3
4
5
6
7
8
9
10
11
12
13
14
15
16
17
18
19
20
21
22
23
24
25
26
27
28
29
| const parser = require("@babel/parser");
const traverse = require("babel-traverse").default;
let source = `let fn = function() {
console.log('hello, world');
}`
// 1、解析
let ast = parser.parse(source, {
sourceType: "module",
plugins: ["dynamicImport"]
});
// 2、遍历
traverse(ast, {
FunctionExpression(path, state) { // 函数表达式会进入当前方法
+ // 获取函数当前节点信息
+ let node = path.node,
+ params = node.params,
+ blockStatement = node.body,
+ isGenerator = node.generator,
+ isAsync = node.async;
+ // 可以尝试打印看看结果
+ console.log('node:', node);
+ console.log('params:', params);
+ console.log('blockStatement', blockStatement);
},
});
|
终端执行node index.js可打印出当前函数的AST节点信息。
创建try/catch节点
在文章AST实现函数错误的自动上报中给出了创建节点的一些作者的个人经验,很受用。
首先需要知道当前新增代码段它的声明是什么,然后使用 @babel-types 去创建即可。
个人理解所谓“新增代码段的声明”指的应该是代码段在AST节点中的type类型。
第一步:那么我们如何知道它的表达声明type是什么呢?这里我们可以 使用 astexplorer 查找它在 AST 中 type 的表达。
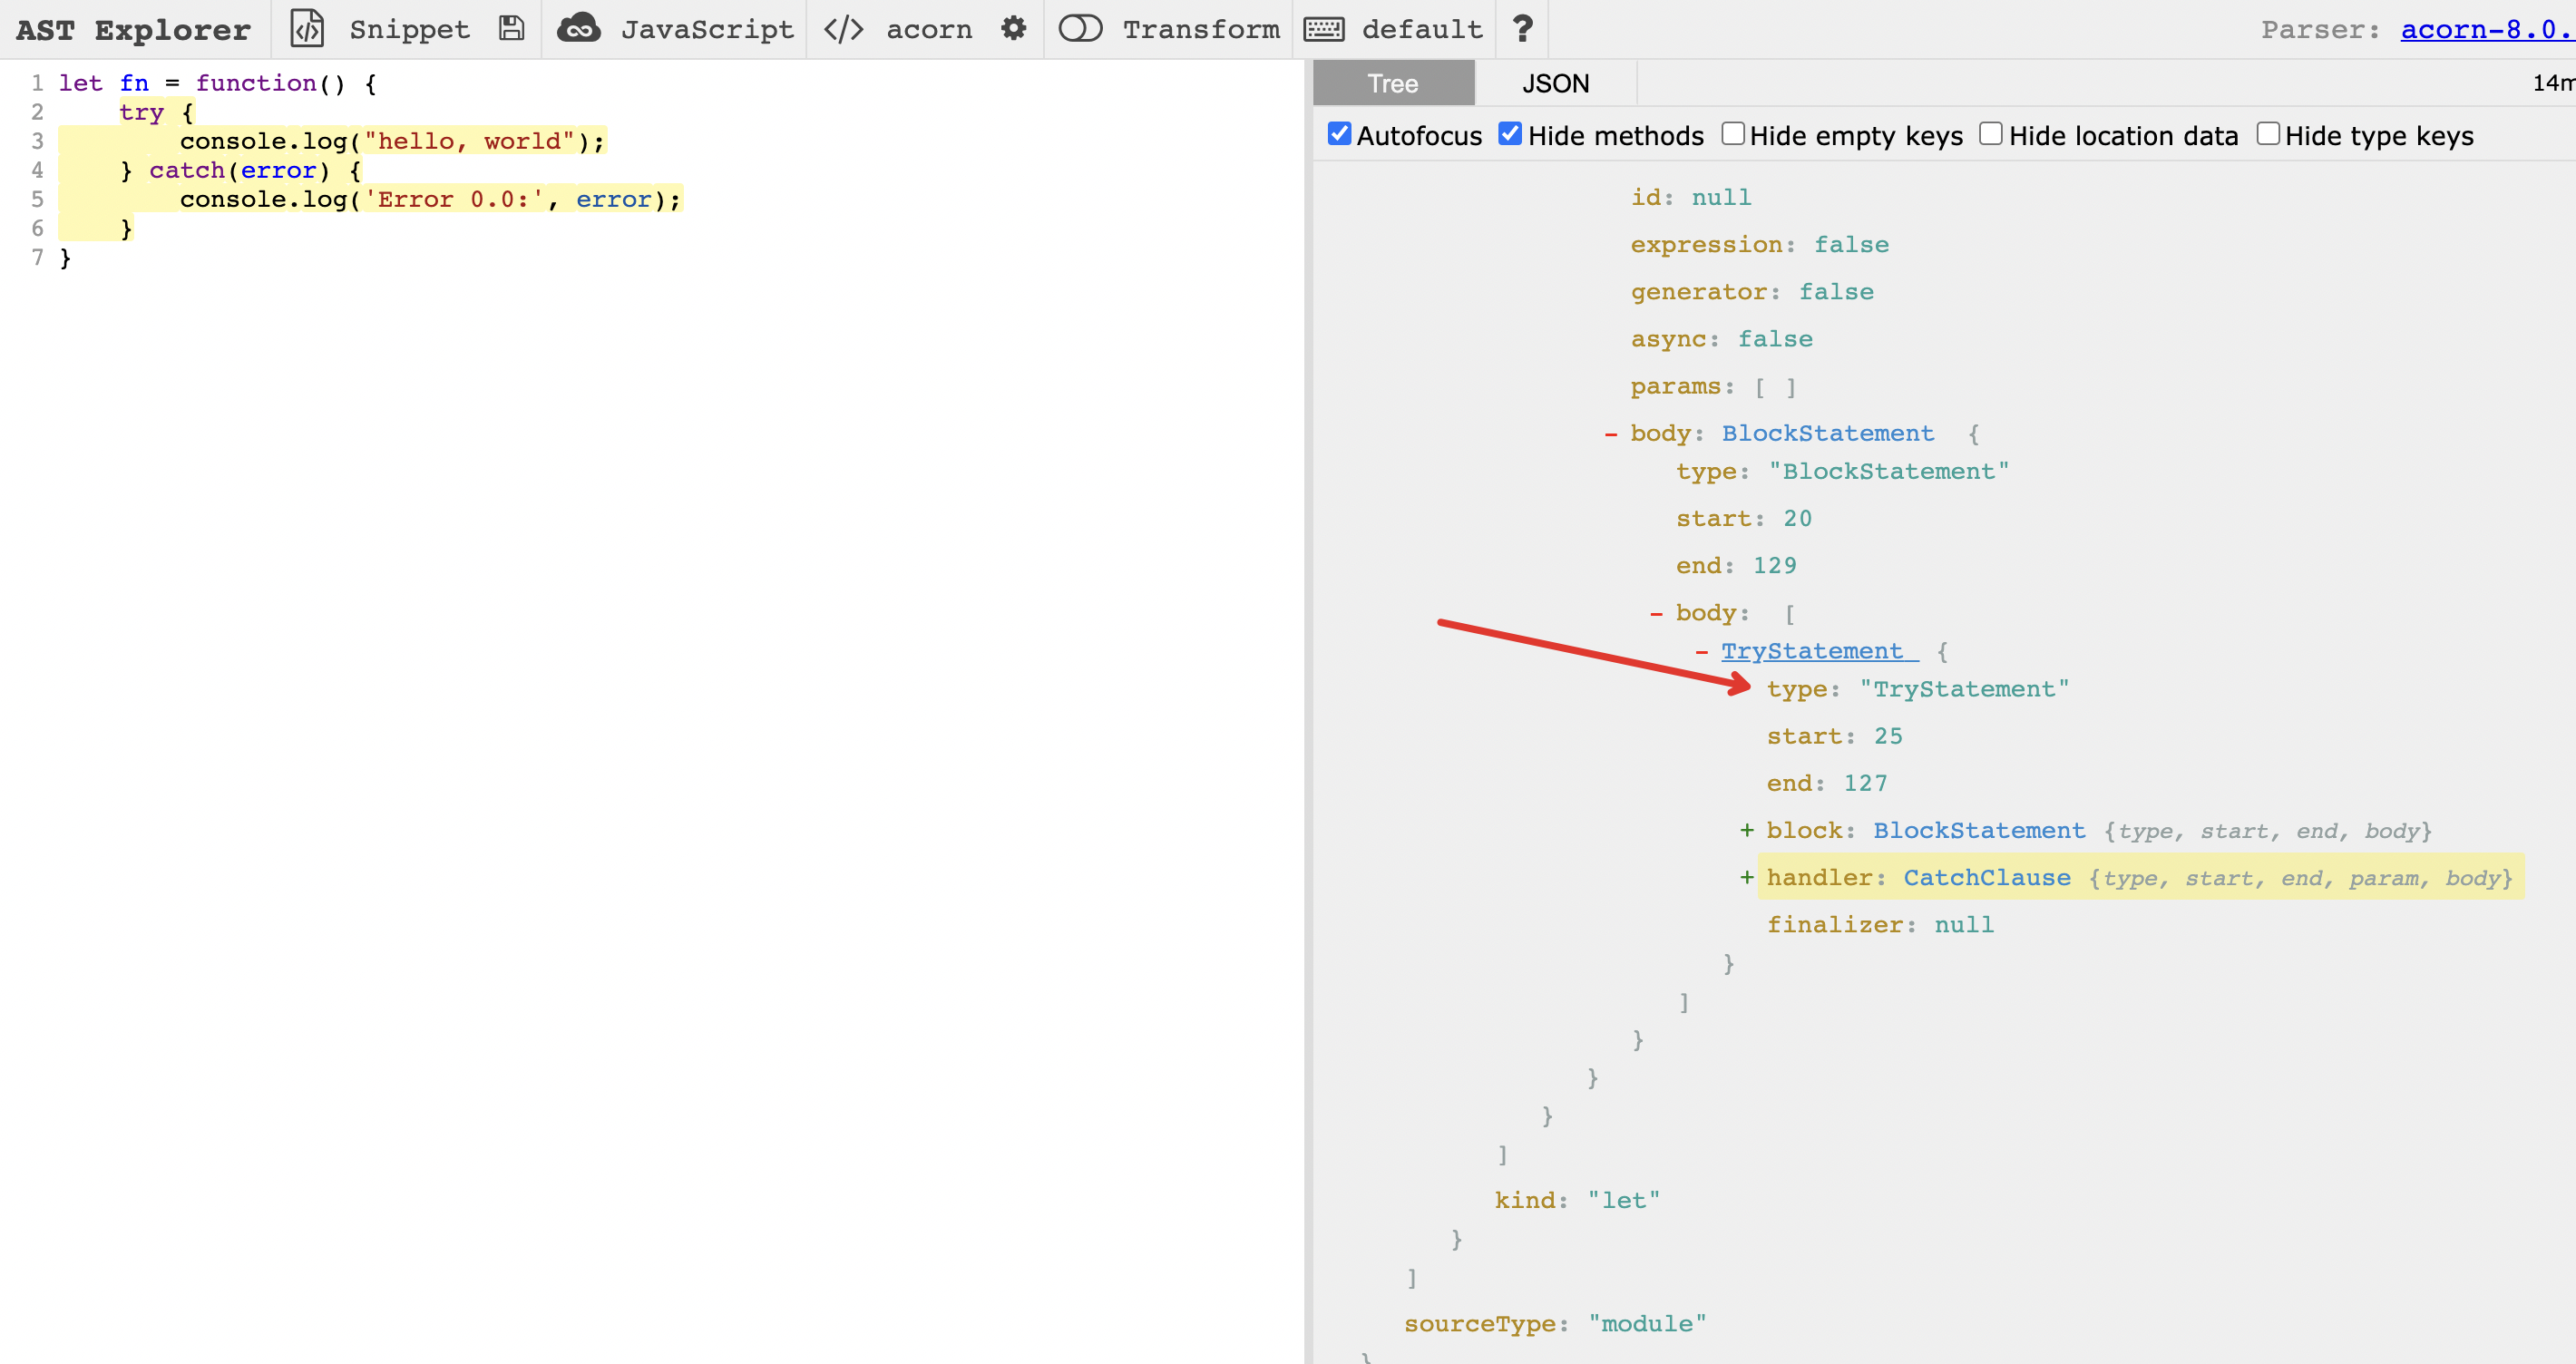
如上截图得知,try/catch 在 AST 中的 type 就是 TryStatement!
第二步
然后去 @babel-types 官方文档查找对应方法,根据 API 文档来创建即可。
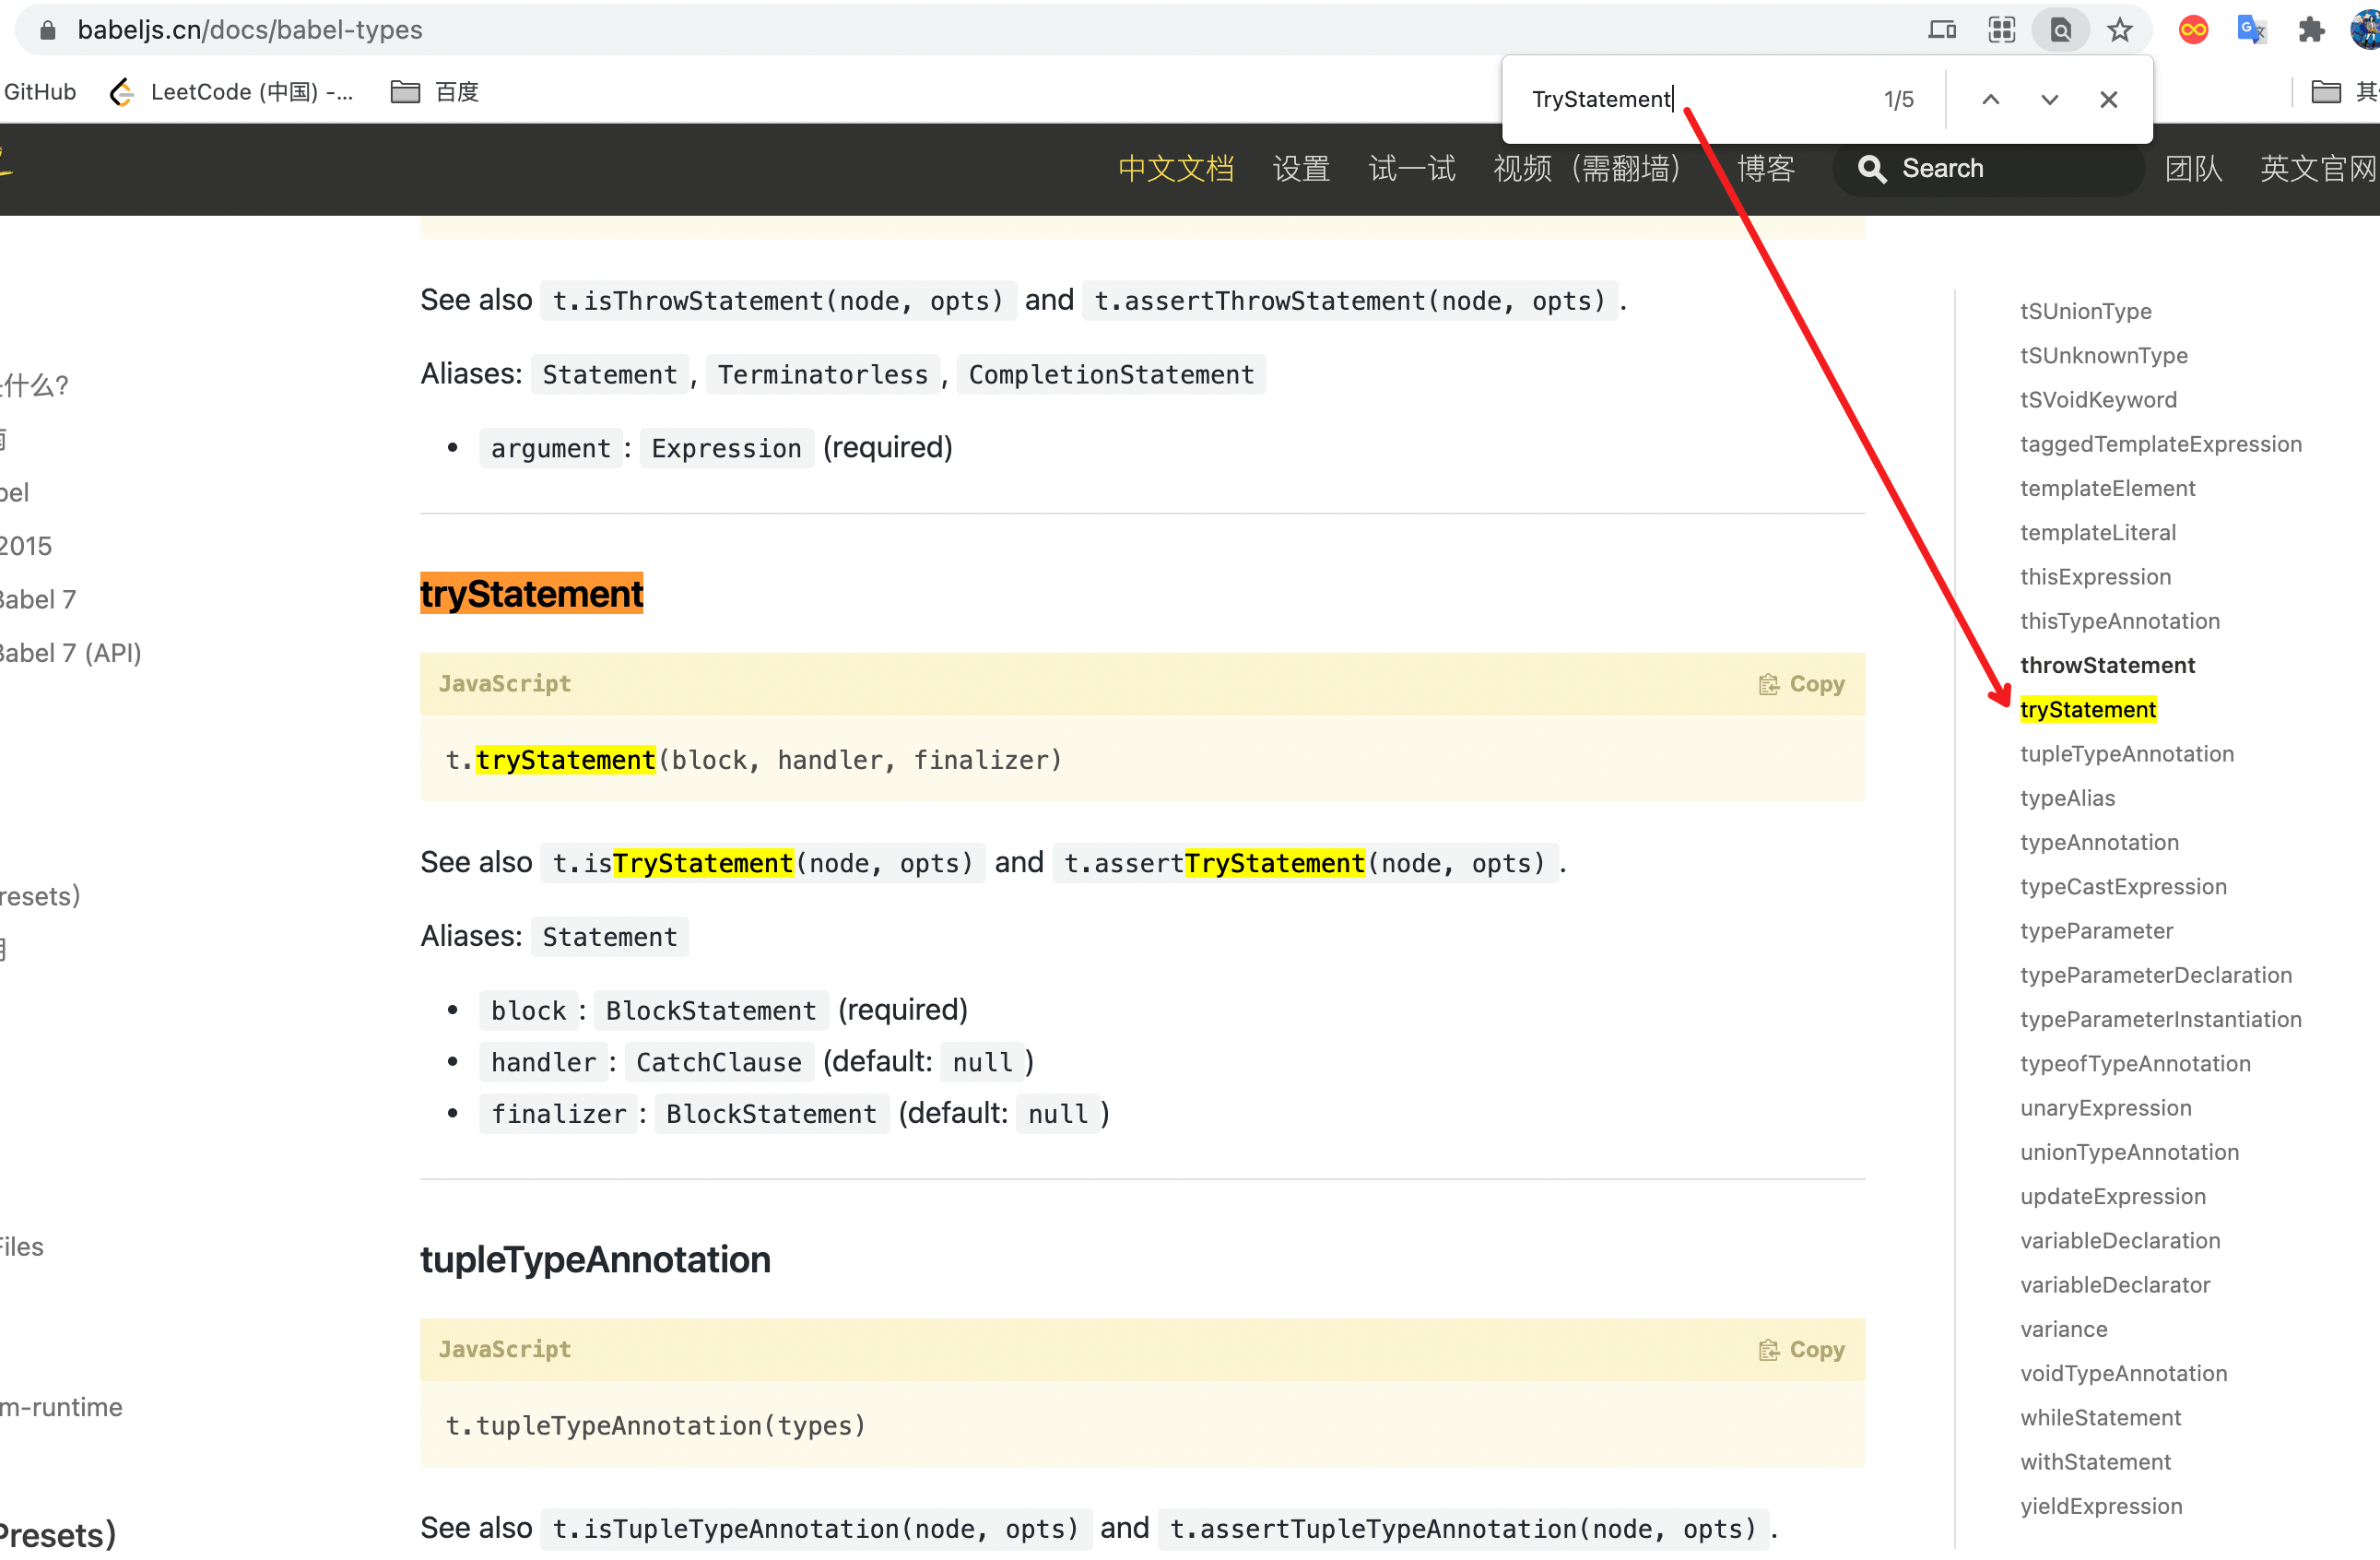
如文档所示,创建一个 try/catch 的方式使用 t.tryStatement(block, handler, finalizer)。
创建新的ast节点一句话总结:使用 astexplorer 查找你要生成的代码的 type,再根据 type 在 @babel-types 文档查找对应的使用方法使用即可!
那么创建try/catch只需要使用t.tryStatement(block, handler, finalizer)即可。
- block(type:blockStatement), 表示 try 中的函数代码块,即原先函数 body 内的代码
{console.log('hello, world')},可以直接用 path.node.body 获取;
- handler(type:CatchClause), 表示 catch 代码块,即我们想要去改造进行错误信息自定义的代码,可以使用
@babel/template 去生成。
- finalizer(type:BlockStatement), 表示
finally代码块。
代码示例如下:
1
2
3
4
5
6
7
8
9
10
11
12
13
14
15
16
17
18
19
20
21
22
23
24
25
26
27
28
29
30
31
32
33
34
35
| const parse = require('@babel/parser');
const traverse = require('babel-traverse').default;
const template = require('@babel/template');
const t = require('babel-types');
let source = `let fn = function() {
console.log('hello, world');
}`
// 1. 解析
let ast = parse.parse(source, {
sourceType: 'module',
plugins: ["dynamicImport"]
});
// 2. 遍历
traverse(ast, {
FunctionExpression(path) {
let node = path.node,
params = node.params,
blockStatement = node.body,
isGenerator = node.generator,
isSync = node.async;
//创建 catch 节点中的代码
+ let cacheStatement = template.statement(`console.log('Error 0.0', error)`)();
+ let cacheClause = t.catchClause(
+ t.identifier('error'),
+ t.blockStatement([cacheStatement])
+ );
+ // 创建 try/catch 的 ast
+ let tryStatement = t.tryStatement(blockStatement, cacheClause);
}
});
|
创建新函数节点,并将上面定义好的 try/catch 塞入函数体:
1
2
3
4
5
6
7
8
9
10
11
12
13
14
15
16
17
18
19
20
21
22
23
24
25
26
27
28
29
30
31
32
33
34
35
36
37
38
39
40
| const parse = require('@babel/parser');
const traverse = require('babel-traverse').default;
const template = require('@babel/template');
const t = require('babel-types');
let source = `let fn = function() {
console.log('hello, world');
}`
// 1. 解析
let ast = parse.parse(source, {
sourceType: 'module',
plugins: ["dynamicImport"]
});
// 2. 遍历
traverse(ast, {
FunctionExpression(path) {
let node = path.node,
params = node.params,
blockStatement = node.body,
isGenerator = node.generator,
isSync = node.async;
//创建 catch 节点中的代码
let cacheStatement = template.statement(`console.log('Error 0.0', error)`)();
let cacheClause = t.catchClause(
t.identifier('error'),
t.blockStatement([cacheStatement])
);
// 创建 try/catch 的 ast
let tryStatement = t.tryStatement(blockStatement, cacheClause);
//创建新节点
+ let func = t.functionExpression(node.id, params, t.blockStatement([tryStatement]), isGenerator, isAsync);
+ console.log('func: ', func);
+ console.log('func.body: ', func.body);
}
});
|
在终端执行node index.js, 可打印节点信息:
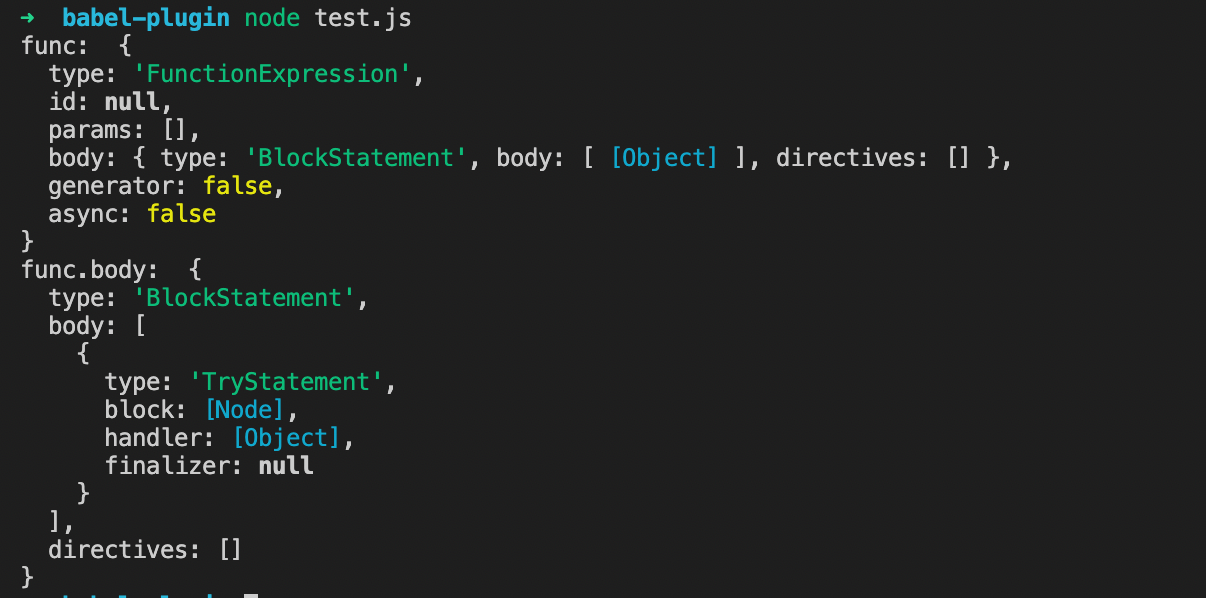
可以看到此时我们在一个函数表达式 body 中创建了一个 try 函数(TryStatement)。
最后我们需要把原来的函数节点进行替换:
1
2
3
4
5
6
7
8
9
10
11
12
13
14
15
16
17
18
19
20
21
22
23
24
25
26
27
28
29
30
31
32
33
34
35
36
37
38
39
40
41
42
43
44
45
| const parse = require('@babel/parser');
const traverse = require('babel-traverse').default;
const template = require('@babel/template');
const t = require('babel-types');
+ const core = require('@babel/core');
let source = `let fn = function() {
console.log('hello, world');
}`
// 1. 解析
let ast = parse.parse(source, {
sourceType: 'module',
plugins: ["dynamicImport"]
});
// 2. 遍历
traverse(ast, {
FunctionExpression(path) {
let node = path.node,
params = node.params,
blockStatement = node.body,
isGenerator = node.generator,
isSync = node.async;
//创建 catch 节点中的代码
let cacheStatement = template.statement(`console.log('Error 0.0', error)`)();
let cacheClause = t.catchClause(
t.identifier('error'),
t.blockStatement([cacheStatement])
);
// 创建 try/catch 的 ast
let tryStatement = t.tryStatement(blockStatement, cacheClause);
//创建新节点
let func = t.functionExpression(node.id, params, t.blockStatement([tryStatement]), isGenerator, isAsync);
+ path.replaceWith(func);
}
});
//将新生成的AST转换为Source源码
+ return core.transformFromAstSync(ast, null, {
+ configFile: false
+ }).code
|
边界条件
我们并不需要给所有的函数添加try/catch,因此我们还需要处理一些边界条件:
- 如果已经有 try/catch 包裹
- 需要 try catch 的只能是语句,像 () => 0 这种的 body
- 函数内容小于行数
满足以上条件return掉;
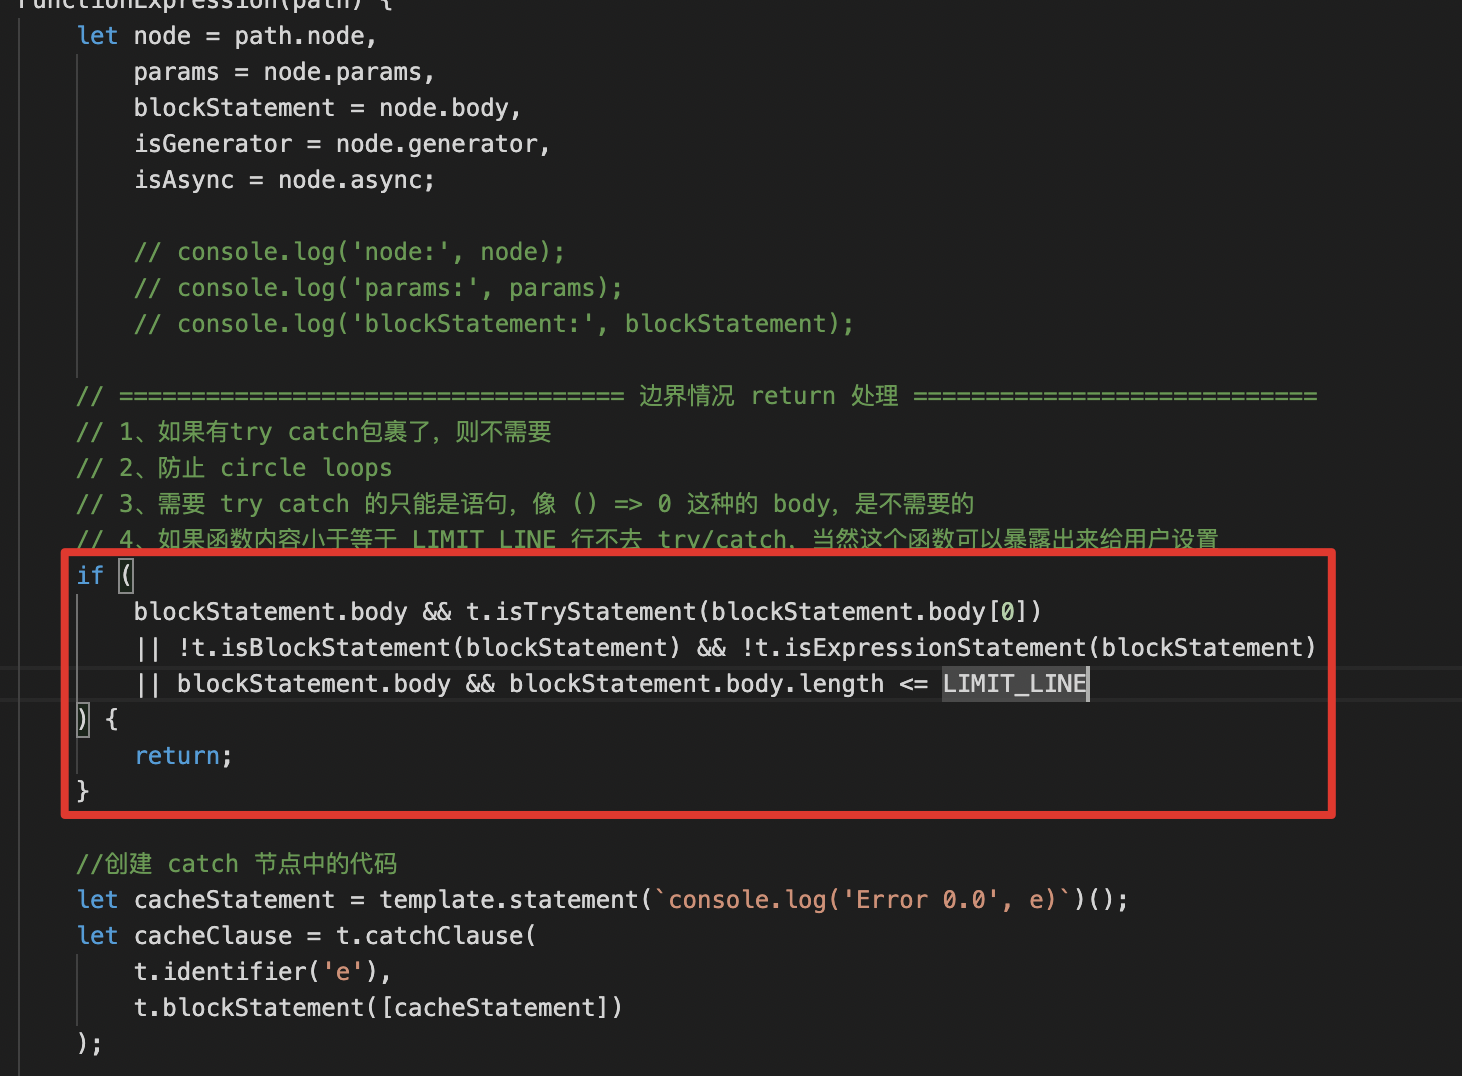
图中未体现:const LIMIT_LINE = 0;
loader
loader 是导出为一个函数的 node 模块。该函数在 loader 转换资源的时候调用。因此,我们基本可以写成这个样子:
1
2
3
| module.exports = function(source){
}
|
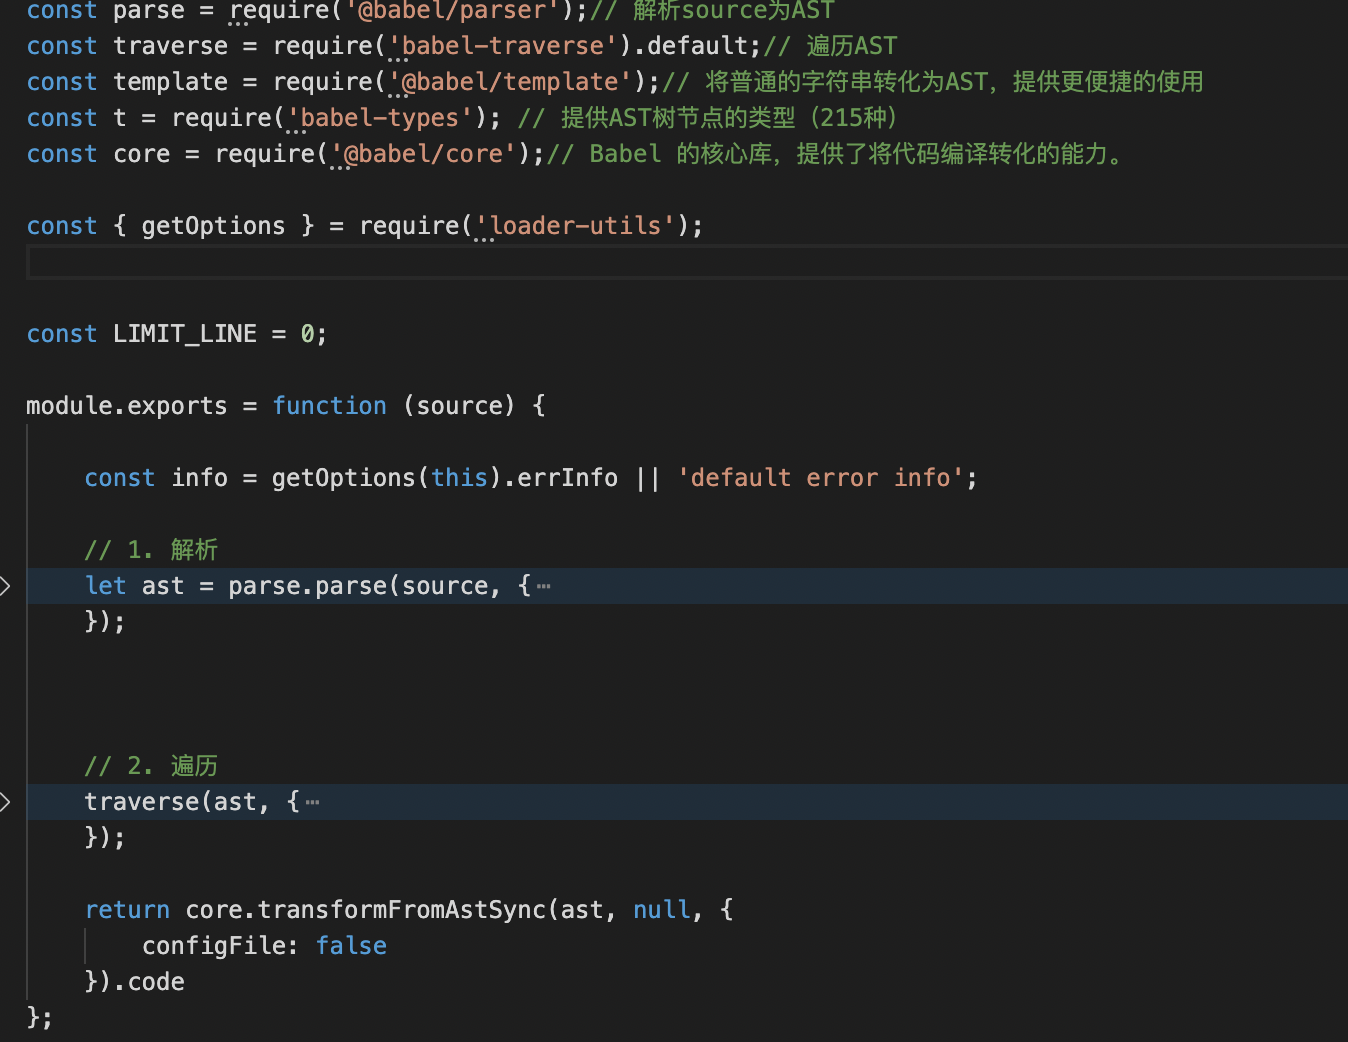
最后我们发布npm平台
使用
首先安装:
webpack.config.js配置:
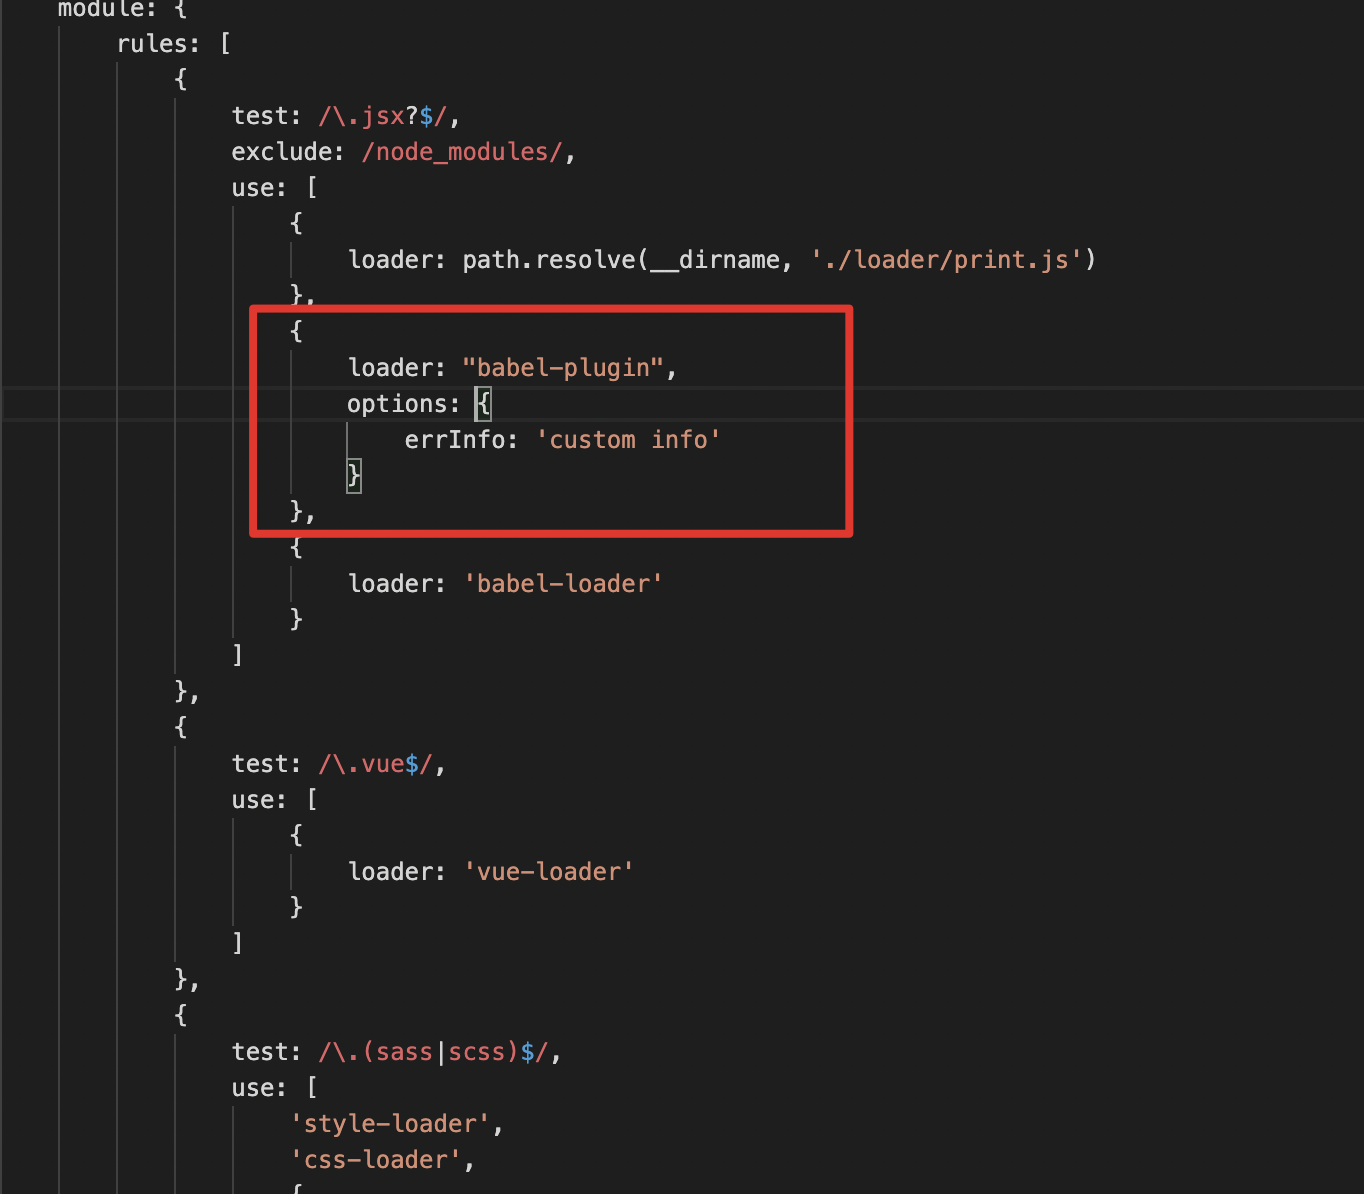
让我们的loader来接受babel-loader的输出。
并且可以通过options来自定义错误提示信息。这个可以通过loader 工具库(Loader Utilities)来获取options对象。
在代码修改如下:
1
2
3
4
5
6
7
8
9
10
11
12
13
14
15
16
17
18
19
20
21
22
23
24
25
26
27
28
29
30
31
32
33
34
35
36
37
38
39
40
41
42
43
| const parse = require('@babel/parser');// 解析source为AST
const traverse = require('babel-traverse').default;// 遍历AST
const template = require('@babel/template');// 将普通的字符串转化为AST,提供更便捷的使用
const t = require('babel-types'); // 提供AST树节点的类型(215种)
const core = require('@babel/core');// Babel 的核心库,提供了将代码编译转化的能力。
+ const { getOptions } = require('loader-utils');
const LIMIT_LINE = 0;
module.exports = function (source) {
+ const info = getOptions(this).errInfo || 'default error info';
// 1. 解析
let ast = parse.parse(source, {
sourceType: 'module',
plugins: ["dynamicImport"]
});
// 2. 遍历
traverse(ast, {
FunctionExpression(path) {
//...
//创建 catch 节点中的代码
+ let cacheStatement = template.statement(`console.log('${info}', error)`)();
let cacheClause = t.catchClause(
t.identifier('error'),
t.blockStatement([cacheStatement])
);
// 创建 try/catch 的 ast
let tryStatement = t.tryStatement(blockStatement, cacheClause);
let func = t.functionExpression(node.id, params, t.blockStatement([tryStatement]), isGenerator, isSync);
path.replaceWith(func);
}
});
return core.transformFromAstSync(ast, null, {
configFile: false
}).code
};
|
测试
可再写一个简单的loader来接收babel-plugin的输出。并且在这个loader中把babel-plugin的输出打印出来。
1
2
3
4
5
6
7
|
module.exports = function(params) {
console.log('<=======up========>');
console.log(params);
console.log('<========down=======>');
return params;
}
|
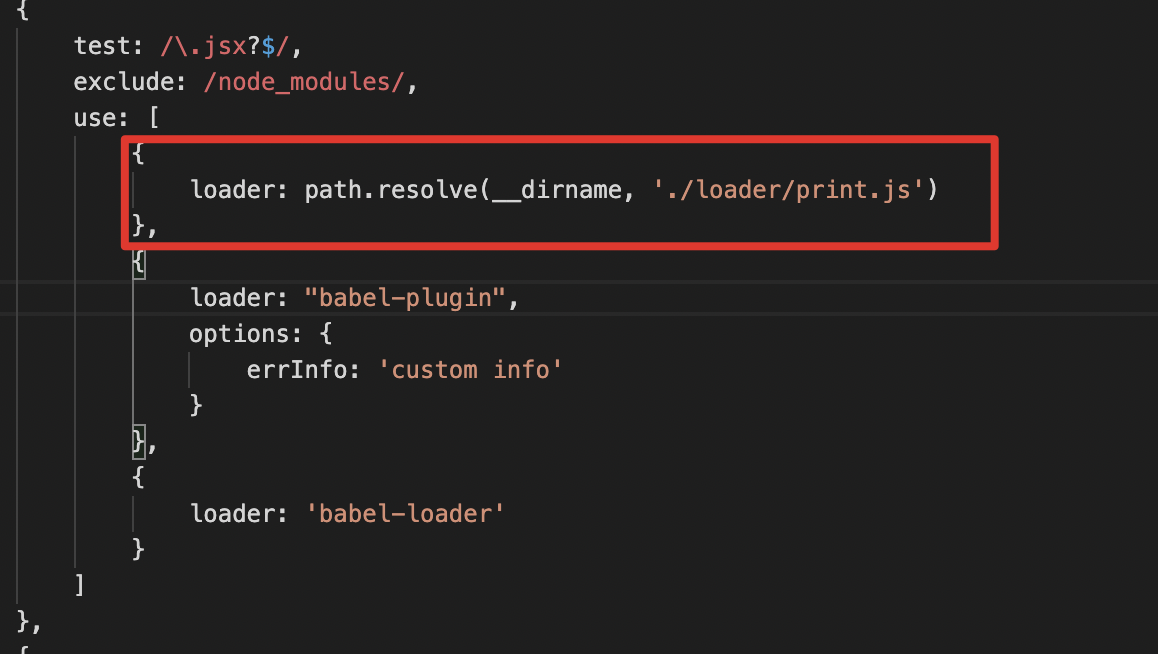
输出如下:
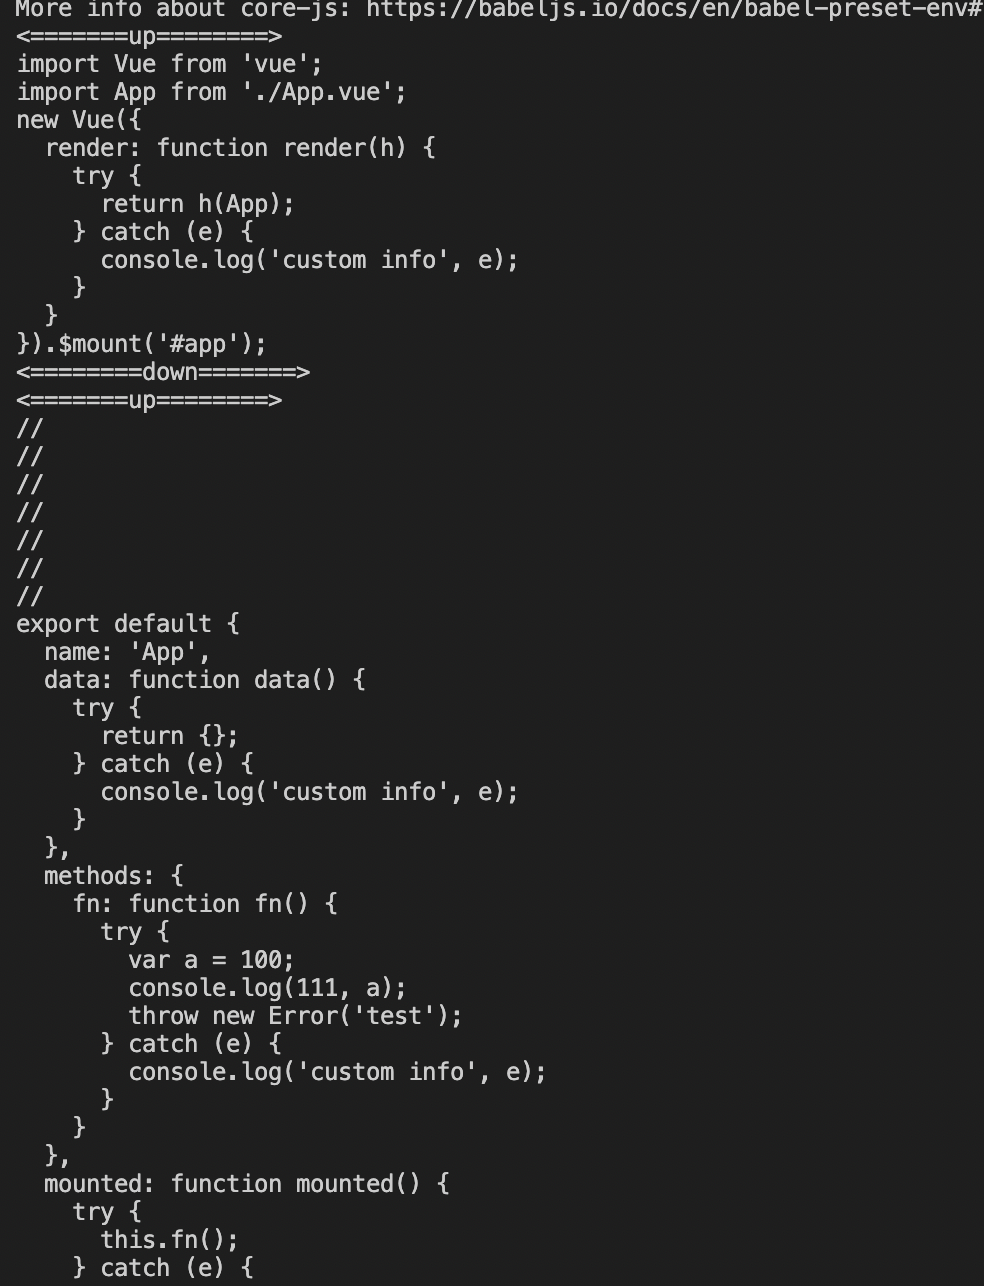
可见babel-plugin生效。
最后
感觉还有很多要去了解的,AST、babel、loader等。这次算开启了新的大门,AST真的强大,日后可以刻意的去练习。真是
路漫漫其修远兮,吾将上下而求索。
加油~~
参考文章


